Good HTML forms require attention on at least four points:
- Semantics
- Accessibility
- Functionality
- Design
often, a form interrupts a user’s main focus and direction on a page:
they’re intent on purchasing that gift, or trying out your new web app,
not giving you their shipping address or coming up with yet another password.
These tips will make forms easier for you as a developer/designer, and
them as a user.
Semantics
1 : Use fieldsets to encapsulate similar fields
Generally, forms are made up of inputs inside form tags. When you’vegot a lot of fields that the user must fill out, it can be easier for
both the user and you, the developer, to keep track of input by using
fieldsets. The perennial example of this is using fieldsets to separate
a billing address and a shipping address.
- <fieldset>
- <span>Billing Address</span><input type="text" />
- <span>City</span><input type="text" />
- <span>Province</span><input type="text" />
- <span>Postal Code</span><input type="text" />
- </fieldset>
- <fieldset>
- <span>Shipping Address</span><input type="text" />
- <span>City</span><input type="text" />
- <span>Province</span><input type="text" />
- <span>Postal Code</span><input type="text" />
- </fieldset>
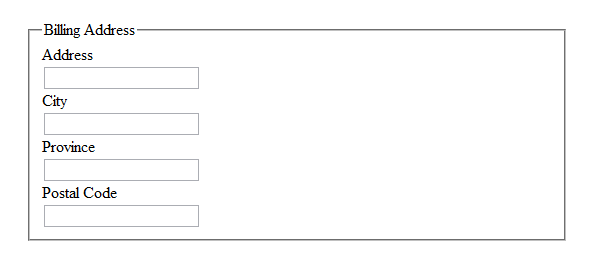
2 : Label Fieldsets with Legends
It hardly makes sense to use a fieldset without giving it a clear name.We can improve the code above by using the legend element to title our
fieldsets. The fieldset element has a border by default, and the legend
will lay itself over that border.
- <fieldset>
- <legend>Billing Address</legend>
- <span>Address</span><input type="text" />
- <span>City</span><input type="text" />
- <span>Province</span><input type="text" />
- <span>Postal Code</span><input type="text" />
- </fieldset>
3 : Name your Inputs
If you want to pass form data to a script, each input element needsto have a name; if you are using PHP, these names will become the keys
to a super global array, usually $_POST or $_GET.
- <fieldset>
- <span>Billing Address</span><input type="text" name="billAddress" />
- <span>City</span><input type="text" name="billCity" />
- <span>Province</span><input type="text" name="billProvince" />
- <span>Postal Code</span><input type="text" name="billPC" />
- </fieldset>
4 : Use the Label Element
Let’s continue improving that code; there’s nothing inherently wrongwith using a span to label the inputs, but the label tag is a born match for inputs.
- <fieldset>
- <legend>Billing Affress</legend>
- <label>Address</label><input type="text" name="billAddress" />
- <label>City</label><input type="text" name="billCity" />
- <label>Province</label><input type="text" name="billProvince" />
- <label>Postal Code</label><input type="text" name="billPC" />
- </fieldset>
5 : Give Labels the For Attribute
I really like the ‘for’ attribute; it provides a way to bind a label to aninput. The value of ‘for’ should be the same as the id of the input you want
to bind it to.
- <fieldset>
- <legend>Billing Affress</legend>
- <label for="billAddress">Address</label><input type="text" id="billAddress" name="billAddress" />
- <label for="billCity">City</label><input type="text" id="billCity" name="billCity" />
- <label for="billProvince">Province</label><input type="text" id="billProvince" name="billProvince" />
- <label for="billPC" >Postal Code</label><input type="text" id="billPC" name="billPC" />
- </fieldset>
code’s quality, but they do a special job in the visible content: when
the for attribute is defined, the label becomes a ‘clickable’ area that will
focus the input. For example, clicking the label of a text input will focus
your cursor in the box; clicking the label of a checkbox will check (or uncheck)
the box.
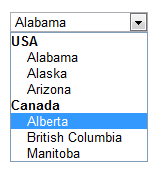
6 : Use optgroup to categorize options
If you have a lot of options in a select, it’s usually better to groupthem into optgroups. <optgroup> is a little-known element that will indent
options and give them a title. Note that the label attribute is required.
- <select>
- <optgroup label="USA">
- <option>Alabama</option>
- <option>Alaska</option>
- <option>Arizona</option>
- </optgroup>
- <optgroup label="Canada">
- <option>Alberta</option>
- <option>British Columbia</option>
- <option>Manitoba</option>
- </optgroup>
- </select>
7 : Always assign complete attributes
When working with forms particularly, it’s tempting to write like this:- <label for="live">Living?</label>
- <input name="live" id="live" type="checkbox" checked disabled />
It isn’t standards-compliant. Whenever you are adding attributes to an element,
don’t cut corners.
- <label for="live">Living?</label>
- <input name="live" id="live" type="checkbox" checked="checked" disabled="disabled" />
8 : Consider using Buttons instead of Submit Inputs
Generally, <input type=”submit” /> has been the universal submitbutton. But HTML has a <button> element. Why would you use it? Well, it’s
generally easier to style buttons; also, you can put images within a button,
so it really offers more flexibility. You can read more in
these two articles.
Accessibility
9 : Put tabindices on your inputs
It’s definitely easier to tab through a form than it is to use your mouse . . .however, by default, your user will tab through in the order they are written in
the HTML. If this isn’t the order you want them to go through the inputs, you can
easily add the tabindex property to your inputs; tabindex takes a number value, and will
hop to the input with the next highest value when you hit that tab key.
- <input type="text" tabindex="2" />
- <input type="text" tabindex="1" />
- <input type="text" tabindex="3" />
10 : Define accesskey when appropriate
The accesskey attribute creates a keyboard shortcut that will focus thatinput: the shortcut is Alt (Option) + the accesskey value. Obviously, you wouldn’t
put an accesskey on every input, but it would certainly be useful on, for example, a search box.
Don’t forget to let users know about the shortcut; often this is done by underlining
the letter, as it’s usually part of the label.
- <label for="search"><span class="shortcut">S</span>earch</label>
- <input type="text" name="s" id="search" accesskey="s" />
11 : Use good focusing techniques
You could argue that this point is as much on the side of design as it is accessibility.It’s always nice if a form field (usually a text box, in this case) changes colour when it’s focused, but for the visually
impaired, it’s almost a requirement if they are to use the form successfully.
To this end, you can use the hover psuedoclass in your CSS; this will work in all
common browsers except IE7 and down. You can also use JavaScript for this;
- input[type=text]:hover {
- background-color:#ffff66;
- border-color:#999999;
- }
12 : Consider people using Screen Readers
Since forms have the tendency to be so tedious, everyone likes a well-designed form.But don’t let a fancy form ignore screen readers: always make sure your inputs are
clearly labeled. If you don’t want those labels to show (maybe you are labeling text
inputs with values that disappear on focus), you can remove them from the visual presentation
(don’t use display: none, though; there are better ways). Also, screen readers generally associate the text directly
before an input to be the label for the input. The exceptions to this are radio
buttons and checkboxes.
Functionality
13 : Use the right Content Type
In most cases you won’t need to put the enctype attribute on your formtag; it will default to “application/x-www-form-urlencoded.” However,
when you have a file input, which will allow the user to upload the file,
you need to use “multipart/form-data.”
- <a><form action="verify.php" method="get" enctype="multipart/form-data">
- &tl;label for="avatar">Upload your Avatar : </label>
- <input type="file" name="avatar" id="avatar" />
- </form>
- </a>
14 : Know when to use Get and when to use Post
A form can send its data by two methods: get and post; you defineone in the method attribute on the form tag. What’s the difference,
and when should you use them? Ignoring what goes on at the server,
the main difference is the way the browser sends the information.
With get, the form data is send as a query, visible in the url. So
this form . . .
- <a><form action="you.php" method="get">
- &tl;label for="fname">First Name</label>
- <input type="text" name="fname" id="fname" value="Bill" />
- &tl;label for="lname">Last Name</label>
- <input type="text" name="lname" id="lname" value="Gates" />
- </form>
- </a>
When you use post, the data is sent in the HTTP request header.
That way, it’s not visible to the average user. So which should you
use when? Post is better for sensitive data (like passwords) and any
data that will generally change something (e.g. add a record to
the database). Also, post is your only option if you’re uploading
a file. Get is great for querying the database, and other requests
that don’t have a lasting affect on anything (“idempotent” the spec
calls it). Really, I’ve just scratched the surface on the differences
here: there are other articles that go into this in-depth.
15 : Validate on both the Client and Server
the client and on the server; validating in the browser allows you to warn
the user of mistakes before they submit the form, which requires one less
transaction with the server. However, always be sure to validate on the server
as well, for security’s sake.
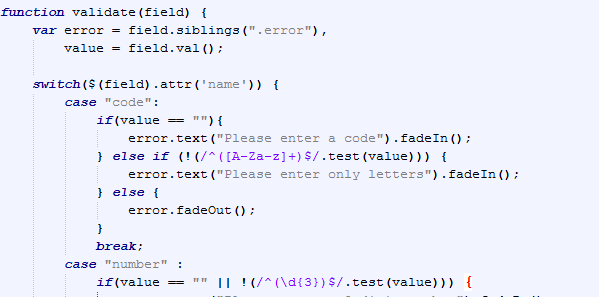
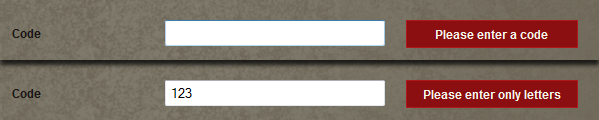
16 : Give your Users Smart Warnings
This goes hand in hand with the previous best practice. Too many times I’vesubmitted a form only to be told “Fields were not filled correctly.” Can you spell
vague? Once you’ve determined that your user has made a mistake, let them know as
soon and as clearly as possible. Put your error messages close to the bad field,
and let your user know what’s wrong with their entry. I like using the jQuery’s blur()
event for this: as soon a user hops to the next box, the previous one is validated.
17 : Consider using AJAX to submit
Many times, submiting a form results in a simple message: “Thank you,” “Check youremail for confirmation,” or “We’ll get back to you when we can.” When that’s the case,
what better place to use AJAX? You could just fade out the form, send the data with
jQuery or (YOUR FAVOURITE LIBRARY), and fade in your message.

18 : Make sure your form works without Javascript
Maybe this should have gone under accessibility; although the last couple of tips needJavaScript to work at all, make sure your form is completely functional without them. This means a regular
form submit, server-side validation, and good errors after a page reload.
Design
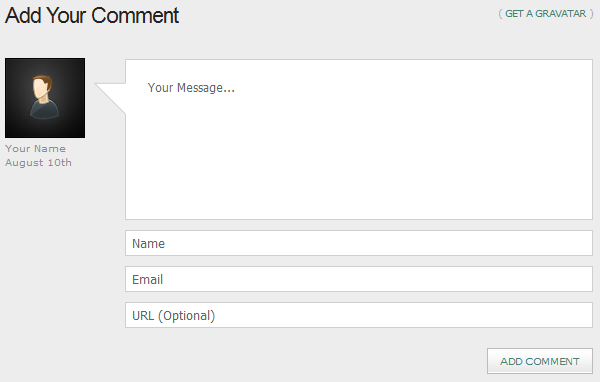
19 : Style Forms Consistently
I’m no designer, and I don’t pretend to be, but I do know this much: don’t fling yourform fields carelessly around. Your form should be consistent in its styling. Decide whether
your labels will be to the left or right (or perhaps above or below) of the fields, and stick
with it. Make all your text inputs and textareas the same width. Space all your fields equally.
Keep at least one edge of all boxes aligned. The tuts+ comment forms are great examples of well-styled forms.
20 : Consider using JavaScript to Consistently Style Forms over Different Platforms
With upteen browsers/operating system combinations, form element consistency is hardlypossible . . . without the help of a bit of JavaScript. If you want your forms
to look the same on almost every browser, check out the
jqTransform jQuery plugin,
a plugin aimed directly at this compatibility problem. Simply include it, call it, and adjust the included css file
to your taste; it works with IE6+, Safari 2+, Firefox 2+, and Chrome.
21 : Be inspired by others
If you’re having trouble coming up with that unique form design for your site, go for alittle inspiration! Smashing Magazine has a
great roundup of forms,
and Smileycat’s “Elements of Design” Gallery has a bunch of
Blog Comment Forms worth checking out.

Conclusion
22: Look forward to HTML 5 Forms
HTML 5 has some great features for web forms. Two of the most exciting ones are new typesfor inputs (like url, email, and date) and the datalist element, which can be used for easy
autocomplete. When these and other parts of the spec get implemented, dynamic forms will be
much easier!
Website forms can be challenging, but I hope these tips will help you make your forms stand
out from the rest. Have a good tip that I didn’t mention? Let’s hear it in the comments!
No comments:
Post a Comment