Theme Development part-02
Before diving straight in and developing a WordPress theme, it is vital
that we understand the basics and have a solid foundation to begin our
theme development. Today, we are going to examine the wordpress admin
panel and explore some of the features.
Theme Development part-03
Moving right along into day three of our Wordpress for Designers series;
today we will start creating our own theme from scratch. We will have a
close look at how exactly to go about setting up your themes stylesheet
and information, as well as creating the index.php page. In addition,
we will examine wordpress template tags, what they are, and how to use
them properly.
Creating a Theme From Scratch
Theme Development part-04
Day 4 is here, and we’re jumping right back into creating our Wordpress
theme from scratch! In this episode, we will have our first look at what
is known as the Wordpress loop. We will be using the WordPress loop as
well as some handy template tags to start pulling out and displaying
content from our database. Lets get started!
The WordPress Loop
Theme Development part-05
Continuing with our WordPress theme development series, today we will
learn how to split and call our seperate theme files and include them in
our theme. Splitting theme code into different and organized files is a
vital part of WordPress development. We will also look at some very
helpful php functions and useful WordPress template tags to create our
widgetized sidebar.
The Sidebar
Resources You Might Enjoy
Theme Development part-06
Happy Valetines Day everyone! We are back and ready for Wordpress for
Designers Day 6 and moving right along with where we left off in Day 5.
Today we will continue to split up our theme files in order to allow us
more flexibilty when working with our theme. We will also have a look
and discuss the Wordpress template hierarchy. In addition, we will be
creating and managing our single.php files, which will help us format
our individual posts. Let’s get going!
Theme Development part-07
Welcome to Wordpress for Designers Day 7! We’re moving right along
with our custom Wordpress theme today and will be creating a few more
files from scratch. We will also finish making our sidebar completely
widget ready and have a look at what that means and how it works. Get
your text editor and local server ready and let’s go!

Widgetize!
Resources You May Find Helpful
Theme Development part-08
Today it’s all about the comments! So many of you have been
requesting that we cover the comments.php page, so today we will do just
that. Throughout this and the next series we will cover all the ins and
outs of dealing with comments in Wordpress, including gravatars and
threaded comments. This is one of the longer screencasts we have done so
get comfortable, start your servers, and lets start day 8!
Comments
Theme Development part-09
With the release of Wordpress 2.7 came some awesome new features to
the comment section, including threaded comments. Today we will pick up
where we left off in Day 8 of the series and continue tweaking our
custom comments.php file to perfection. Not only will we cover threaded
comments, but how to paginate comments as well! It’s a screencast full
of comment enhancements and features, so get ready and let’s do this!
Tweaking the Comments
Theme Development part-10
While we sort out the final touches on the .psd file, we are going to
spend some time today to have a little fun with Wordpress and also
create a very simple Wordpress plugin. If you are interested in learning
more about using RSS feeds with wordpress and would like to learn the
basics of creating a plugin, then today is the day for you!
Your First Plugin
Resources You May Enjoy
PSD is Coming Soon!
I know you have all been waiting for us to get to the .psd and I am excited to say we are nearly there! Stay with us and be sure to add any questions or suggestions you have in the comments section below!Please Note
If you had any issues with the last series and the Wordpress 2.7 comments template, please watch the beginning of this screencast and read all of the comments from that day. There were a few mistakes in the source code all of which have been resolved in the comments and this screencast. The source code above should contain the fixed comments.php file as well. Thanks to all who helped find and clear up any bugs!Theme Development part-11
After a short break, we are back! Today is a big day as we continue on
with our “WordPress for Designers” series and introduce the .psd that we
will be converting. Join us as we get to know the ins and outs of the
design we are working with and the basics of getting our images out of
the .psd and ready for the web.
The PSD
Theme Development part-12
It’s time to move on to Day 12 of “Wordpress for Designers!” We are very
close to jumping in to our Wordpress coding, but before we do we need
to slice out those images. Today, we will have an in depth look at using
the slice tool with our .psd to pull out any images needed to complete
our theme. Wordpress theme here we come!
Slicing
Slicing Resources and Screencasts
- NETTUTS-Slice and Dice That PSD!
- Snook.ca-Slicing in Photoshop and Fireworks
- 12 Fantastic PSD to HTML Tutorials
Theme Development part-13
Get ready to jump straight into WordPress coding as we continue on with
our Wordpress for Designers series. As suggested by many of our readers,
we will go straight into WordPress and begin coding our theme. Today,
we will cover a basic reset, as well as begin coding our home page.
Start your servers, launch your text editor, and let’s go!
This will clear any floats used in the logo or in our navigation. If
you prefer to use a different method of clearing floats, such as using
the ‘overflow’ property, feel free to do so!
WordPress Coding
Clear Those Floats!
My mistake. At the end of the screencast, I forgot to mention to clear the floats that we used on the logo and the navigation. You should make sure the header.php file includes this, the code below reflects the markup you need:<div id='header'> <h1 id='logo'><a href="<?php echo get_option('home'); ?>/"><span>Paper</span> Business</a></h1> <ul id='nav'> <?php wp_list_pages('title_li='); ?> </ul> <br class='dirtyLittleTrick' /> </div>
Theme Development part-14
Moving full steam ahead with our WordPress series, it’s time to finish
our static home page that we have been creating. Today, we will utilize
all kinds of cool WordPress tricks and functions to bring our home page
together. Get ready for a day full of custom fields, WordPress queries,
and special functions!
Resources you may find useful
Theme Development part-15
We’re back with our Wordpress for Designers series! Moving on with our
‘Paper Business’ theme, it’s time to bring in the slider. Today, we will
build and implement a jQuery slider plugin into WordPress, style it
properly, and discuss how we will pull out the information from the
admin panel. Let’s get our slide on!
The Slider
Resources You May Enjoy
Theme Development part-16
Have you missed us? We’re back and ready for more action with our
WordPress for Designers series! We are currently on day sixteen and each
fay we are getting closer to completing our goal. Today, we go over
creating and styling an entire page from scratch, including the sidebar.
Furthermore, we will learn how to use multiple custom fields and text
area inputs to take full advantage of the power of WordPress from the
backend admin panel. Servers on, text editor running, Hanson playing on
iTunes, let’s go!
Resources you may enjoy:
Theme Development part-17
Did someone call for an integrated back end slider? Well, if you did, we
heard you! After much anticipation from our readers, today is the day
we integrate our slider with the backend of WordPress. We will learn all
about how to use the WordPress media manager to let users setup, add,
and edit the slider, all from the convenient backend of WordPress. This
is a day you don’t want to miss, so fire up your server and let’s do
this!
Slider
Resources you May Enjoy.
Theme Development part-18
I’ll bet that many of you have used or have been searching for a
WordPress contact form to you for yourself or a client. Plugins can be
great and very convenient, but your also relying on the plugin developer
to make sure it works and does what you want. Today, we are going to
build our contact page, complete with a working AJAX/php contact form!
We will use the jQuery library to pull off the AJAX call and animation
effects. It’s a day you won’t want to miss if you have ever wondered how
to build an AJAX contact form with WordPress.
Creating an AJAX Contact Form
Resources you May Enjoy…
Create your First WordPress Plugin
WordPress
is the largest blogging platform available on the internet today; and
with the official release of version three just around the corner, it’s
only going to get bigger. As such, over the next few self-contained
tuts, we’re going to learn the ins and outs of WordPress plugin
development, starting with the creation of our first simple plugin,
“Simple Optimization.”
This
text is the bare-bones minimum needed for a plugin to appear in the
WordPress plugin directory. You’ll obviously need to fill each part as
you see fit.
To do so, we use a very simple function called “remove_action(‘action’,'function’)”. This function will remove the function declared in the second parameter from the action, the first parameter.
The same exact same principle applies to the two filters we’re going to remove:
Let’s start out by creating a new function, tags_to_keywords(), and, inside of this function, we’ll write a simple if statement, which checks to see if the current page is a single post or page (using the WP functions: is_single() and is_page()). Next, we’ll create a variable inside this if statement, named $tags, and set its content to the function wp_get_post_tags(); however, in order for this function to work, we need to pass in a parameter of “post_id”. The easiest way for us to obtain that is to globalize the WP variable $post which contains the post ID ($post->ID, $post is an object which is why we’re calling its values like so).
Next, we’ll use a foreach to filter through the $tags data, and create a new array with only the information we want ($tag_array). Following that, we’ll implode the array into a string and separate each item from the array with a comma and space ($tag_string).
Then, we’ll create another if statement that checks to see if
$tag_string has a value (meaning, do we have any tags for the post) and
if it does, echo out the final HTML.
The last thing we need to do now is attach our new function with the wp_head action. To do this, we’re going to call add_action(‘action’,'function’), and pass it the parameters “wp_head” and “tags_to_keywords” (in that order).
To
further increase our SEO, we’re going to add our description meta-data
to the header as well, using the same method as the keywords. Once we
have the if statement rewritten, we’re going to create a new variable $all_post_content and fill it using the WP function wp_get_single_post()
(and pass the parameter of $post->ID). This will give us an object
full of all the data about our post. With this variable, we can create a
description using the actual content of the post, but we’re going to
shorten it down to one hundred characters using the function substr ($excerpt). And then, we’ll just echo out the HTML with the excerpt written in. (Optionally, you can also add an else statement, and echo your blog description using the function get_bloginfo(‘description’).)
While
this function works, it will never actually run because WordPress has
no way to know to run it. Luckily, WordPress has a feature called cron,
which schedules functions to run at specific intervals (daily, weekly,
etc…); this is perfect for us, since we want to frequently optimize our
database. To use Cron, we’re going to create a new function (simple_optimization_cron_on), and fill it with another function call to wp_schedule_event().
To work, wp_schedule_event needs three things: a time to run, an
interval between each run, and a function to call; so we’ll pass it the
parameters: ‘time()’ (we’ll assume that whenever the cron event is
created is a good time to call the function), ‘daily’,
‘optimize_database’ in that order.
Great, now we have our optimize_database function being added to the WP cron list, or we would if we were to call the simple_optimization_cron_on
function. It’s really unsafe and is a bad practice to call your own
event addition functions, because through some arbitrary system of
events, it could cause the function to be called multiple times.
WordPress happens to have a set of specific hooks for plugins to solve
this problem: register_activation_hook and register_deactivation_hook.
These functions are called when a plugin is turned on (activated) and
turned off (deactivated). This way, our cron function can only be added
once. Now, we have the ability to remove the cron event if the plugin
stops being used. To work, these functions need two pieces of
information: the url to the file that has the activation and
deactivation functions (99% of the time “__FILE__” will work perfectly
here), and the name of the activation and deactivation function. We’ll
also create a new function (simple_optimization_cron_off), and fill it with a call to another function (wp_clear_scheduled_hook(‘optimize_database’)) to delete our cron event.
Step 0 Before we Begin
This tutorial is going to assume that you have at least a beginner’s understanding of PHP and the WordPress syntax. Though we’ll be covering everything, some knowledge beforehand will help you grasp the concepts much more easily. I’ll also assumes that you have a WP blog setup and ready to go.Step 1. What our Plugin Does
The very first step, when writing a WP plugin, is to determine everything you want it to do. Since this is our first plugin, we won’t do anything too drastic. Let’s create something which will speed up our blog; our pages will render faster, and we’ll also do a little SEO to improve our search rank and findability.“Always create a list of what you want your plugin to actually do before you write any code!”
Remove useless meta tags:
- “rsd_link” – Really Simple Discovery Link
- “wlwmanifest_link” – Windows Live Writer link
- “wp_generator” – WordPress version number
Remove unnecessary filters:
- “wptexturize” – Curly quotes
- “wp_filter_kses” – HTML in user profiles
SEO:
- Insert post tags into <head> as keywords
- Insert post excerpt into <head> as description
Step 2. Laying the Groundwork
To start, navigate to your plugins folder (“/wp-content/plugins/”), and create a new folder. We’ll call ours “simple-optimization.” Next, inside of this folder we’re going to need to create two files. The first will be the actual plugin file (named “main.php”), and the second will be the mandatory README (“readme.txt”). We’re going to leave readme.txt empty for the time being; so open main.php in your preferred text-editor and copy in the code below.- <?php
- /*
- Plugin Name: Name Of The Plugin
- Plugin URI: http://URI_Of_Page_Describing_Plugin_and_Updates
- Description: A brief description of the Plugin.
- Version: The Plugin's Version Number, e.g.: 1.0
- Author: Name Of The Plugin Author
- Author URI: http://URI_Of_The_Plugin_Author
- License: A "Slug" license name e.g. GPL2
- .
- Any other notes about the plugin go here
- .
- */
- ?>
Step 3. Adding Features
The first two features we’re going to implement will also be the simplest. By default, WordPress adds several meta-tags to the <head> section of your blog, but the simple fact of the matter is that these meta-tags have absolutely no value at all; so we’re simply going to stop WordPress from adding them. Anytime WordPress performs an action, it’s either called a filter or an action, and we can either remove or manipulate these filters and actions (you can find a list of all the filters here, and all the actions here). In this case, we want to remove the various actions that add those meta-tags.To do so, we use a very simple function called “remove_action(‘action’,'function’)”. This function will remove the function declared in the second parameter from the action, the first parameter.
- // Clean up wp_head
- // Remove Really simple discovery link
- remove_action('wp_head', 'rsd_link');
- // Remove Windows Live Writer link
- remove_action('wp_head', 'wlwmanifest_link');
- // Remove the version number
- remove_action('wp_head', 'wp_generator');
- // Remove curly quotes
- remove_filter('the_content', 'wptexturize');
- remove_filter('comment_text', 'wptexturize');
- // Allow HTML in user profiles
- remove_filter('pre_user_description', 'wp_filter_kses');
Step 4. SEO
Now that we’ve cut out that bloat, let’s ensure our blog has some basic SEO; meaning, let’s make sure we have keywords per-page, which correspond to that page and change the description to match more with the article. For our keywords, we’re going to grab the tags of the current page/post. This is made super simple by the function “wp_get_post_tags()”. wp_get_post_tags will return an array of tags from the current post. We can then easily format this array into a string and place it within our header (inside the function “wp_head()”, that every theme should have in it already) by attaching our function to the wp_head action.Let’s start out by creating a new function, tags_to_keywords(), and, inside of this function, we’ll write a simple if statement, which checks to see if the current page is a single post or page (using the WP functions: is_single() and is_page()). Next, we’ll create a variable inside this if statement, named $tags, and set its content to the function wp_get_post_tags(); however, in order for this function to work, we need to pass in a parameter of “post_id”. The easiest way for us to obtain that is to globalize the WP variable $post which contains the post ID ($post->ID, $post is an object which is why we’re calling its values like so).
- // SEO
- // add tags as keywords
- function tags_to_keywords(){
- global $post;
- if(is_single() || is_page()){
- $tags = wp_get_post_tags($post->ID);
- }
- }
- function tags_to_keywords(){
- global $post;
- if(is_single() || is_page()){
- $tags = wp_get_post_tags($post->ID);
- foreach($tags as $tag){
- $tag_array[] = $tag->name;
- }
- $tag_string = implode(', ',$tag_array);
- if($tag_string !== ''){
- echo "<meta name='keywords' content='".$tag_string."' />\r\n";
- }
- }
- }
- add_action('wp_head','tags_to_keywords');
- // add except as description
- function excerpt_to_description(){
- global $post;
- if(is_single() || is_page()){
- $all_post_content = wp_get_single_post($post->ID);
- $excerpt = substr($all_post_content->post_content, 0, 100).' [...]';
- echo "<meta name='description' content='".$excerpt."' />\r\n";
- }
- else{
- echo "<meta name='description' content='".get_bloginfo('description')."' />\r\n";
- }
- }
- add_action('wp_head','excerpt_to_description');
Step 5. Optimizing the Database
The final feature for our plugin is going to optimize our database tables by removing overhead (useless/excess data in a SQL table created by manipulating the database). To begin, we’ll create a new function (optimize_database), and inside of it, we’re going to call the global WPDB variable ($wpdb). That way, we can interact with the database, without having to re-enter our authentication details. $wpdb has several methods you can use to interact with and retrieve information from the database (Full list here), but we’re only going to be using one, get_results. Using get_results with the parameters of “SHOW TABLES” and “ARRAY_A” will return to us an associative array of all the table names in the database. At that point, we can use a foreach to loop through each of the array values (using array_values to get the table name, because of how it’s layered by the function) and use another $wpdb method, query to run the optimize command (“OPTIMIZE TABLE _____”).- //Optimize Database
- function optimize_database(){
- global $wpdb;
- $all_tables = $wpdb->get_results('SHOW TABLES',ARRAY_A);
- foreach ($all_tables as $tables){
- $table = array_values($tables);
- $wpdb->query("OPTIMIZE TABLE ".$table[0]);
- }
- }
- function simple_optimization_cron_on(){
- wp_schedule_event(time(), 'daily', 'optimize_database');
- }
- function simple_optimization_cron_off(){
- wp_clear_scheduled_hook('optimize_database');
- }
- register_activation_hook(__FILE__,'simple_optimization_cron_on');
- register_deactivation_hook(__FILE__,'simple_optimization_cron_off');
Step 6. Filling out the ReadMe
The last thing we need to do for our new plugin is fill in the readme.txt file. The readme.txt file is used by the WordPress Plugin directory to display all the information you provide it about your plugin. The best way to learn how to write an effective readme.txt file is to download the default from WP, and alter it accordingly to fit your plugin. Since ours was so simplistic, this is what I personally ended up with:- === Simple Optimization ===
- Contributors: Jonathan Wolfe
- Plugin link: http://net.tutsplus.com/
- Tags: simple, optimization, keywords, tags, description, SEO, optimize, database
- Requires at least: 2.5.1
- Tested up to: 2.9.2
- Stable tag: trunk
- Silently adds several optimizing functions to the WordPress back-end to make your blog
- or site run faster.
- == Description ==
- Simple Optimization adds several functions to WordPress that help trim the fat from
- the system and also clean
- up after itself a little bit all leading to a faster loading time for your blog or website.
- **Features**
- _Remove useless meta tags:_
- * "rsd_link" - Really Simple Discovery Link
- * "wlwmanifest_link" - Windows Live Writer link
- * "wp_generator" - WordPress version number
- _Remove useless filters:_
- * "wptexturize" - currly quotes
- * "wp_filter_kses" - HTML in user profiles
- _SEO:_
- * Insert post tags into <head> as keywords
- _Routinely optimize the database_
- == Installation ==
- 1. Download, unzip and upload to your WordPress plugins directory
- 2. activate the plugin within you WordPress Administration
That’s it!
You just successfully wrote your first WordPress plugin, which is working and ready for the WP Plugins Directory. Along the way, you learned about filters and actions, using WP global objects, a lot about the WordPress nomencalture, how to interact with the database, cron events, and activation/deactivation hooks. If you have any questions, please leave a comment and I’ll respond as soon as I can.The final code:
- <?php
- /*
- Plugin Name: Simple Optimization
- Plugin URI: http://net.tutsplus.com
- Description: A super-simple plugin to improve your blog
- Version: 1.0
- Author: Jonathan Wolfe
- Author URI: http://fire-studios.com
- License: GPL2
- .
- This plugin written for NETTUTS at http://net.tutsplus.com
- .
- */
- // Clean up wp_head
- // Remove Really simple discovery link
- remove_action('wp_head', 'rsd_link');
- // Remove Windows Live Writer link
- remove_action('wp_head', 'wlwmanifest_link');
- // Remove the version number
- remove_action('wp_head', 'wp_generator');
- // Remove curly quotes
- remove_filter('the_content', 'wptexturize');
- remove_filter('comment_text', 'wptexturize');
- // Allow HTML in user profiles
- remove_filter('pre_user_description', 'wp_filter_kses');
- // SEO
- // add tags as keywords
- function tags_to_keywords(){
- global $post; // Get access to the $post object
- if(is_single() || is_page()){ // only run on posts or pages
- $tags = wp_get_post_tags($post->ID); // get post tags
- foreach($tags as $tag){ // loop through each tag
- $tag_array[] = $tag->name; // create new array with only tag names
- }
- $tag_string = implode(', ',$tag_array); // convert array into comma seperated string
- if($tag_string !== ''){ // it we have tags
- echo "<meta name='keywords' content='".$tag_string."' />\r\n"; // add meta tag to <head>
- }
- }
- }
- add_action('wp_head','tags_to_keywords'); // Add tags_to_keywords to wp_head function
- // add except as description
- function excerpt_to_description(){
- global $post; // get access to the $post object
- if(is_single() || is_page()){ // only run on posts or pages
- $all_post_content = wp_get_single_post($post->ID); // get all content from the post/page
- $excerpt = substr($all_post_content->post_content, 0, 100).' [...]'; // get first 100 characters
- and append "[...]" to the end
- echo "<meta name='description' content='".$excerpt."' />\r\n"; // add meta tag to <head>
- }
- else{ // only run if not a post or page
- echo "<meta name='description' content='".get_bloginfo('description')."' />\r\n"; // add
- meta tag to <head>
- }
- }
- add_action('wp_head','excerpt_to_description'); // add excerpt_to_description to wp_head
- function
- //Optimize Database
- function optimize_database(){
- global $wpdb; // get access to $wpdb object
- $all_tables = $wpdb->get_results('SHOW TABLES',ARRAY_A); // get all table names
- foreach ($all_tables as $tables){ // loop through every table name
- $table = array_values($tables); // get table name out of array
- $wpdb->query("OPTIMIZE TABLE ".$table[0]); // run the optimize SQL command
- on the table
- }
- }
- function simple_optimization_cron_on(){
- wp_schedule_event(time(), 'daily', 'optimize_database'); // rdd optimize_database to wp cron
- events
- }
- function simple_optimization_cron_off(){
- wp_clear_scheduled_hook('optimize_database'); // remove optimize_database from wp cron
- events
- }
- register_activation_hook(__FILE__,'simple_optimization_cron_on'); //
- run simple_optimization_cron_on at plugin activation
- register_deactivation_hook(__FILE__,'simple_optimization_cron_off'); //
- run simple_optimization_cron_off at plugin deactivation
- ?>
Working with Custom Page Templates in WordPress
In this talk, Randy Hoyt, a faculty member at the University of Texas at Dallas (UTD), will demonstrate how to take a typical blog structure, and morph it into custom layouts. Along the way, he discusses the inherent differences between posts and pages, how to create custom page templates, how to expedite the process of adding custom fields, and more.
How to Create a FAQ Page with WordPress
Final Product What You'll Be Creating
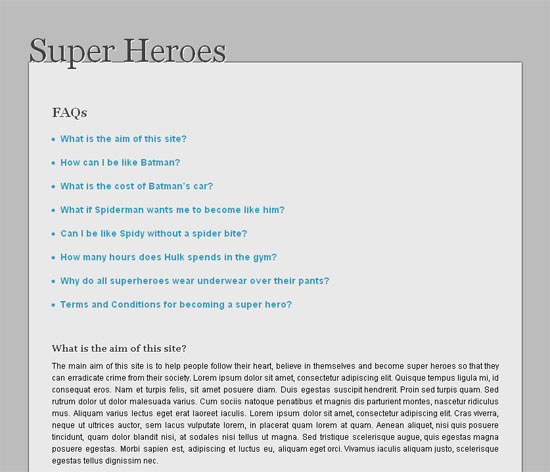
To accomplish our goal, we require a dedicated custom FAQ WordPress post type. That way, we can use the title and the content of these posts to display the FAQs in an innovative and user-friendly way.
Step 1: Installing WordPress
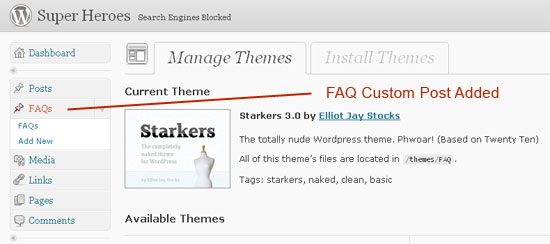
To begin creating the FAQ page, we, of course, must first install WordPress on our localhost. Installing WordPress is a piece of cake; however, if you’re new to this, here is a guide that details the process.The TwentyTen template is the default theme that ships with WordPress.Once WordPress is ready to go, we should next create our custom theme, which will implement the FAQ functionality. There are various methods of creating a custom theme. Some prefer to create a new blank white template, while others like to create child themes of the new TwentyTen template. I have been using the Starker’s theme, by Elliot Jay Stocks for a long time now; we’ll use it to create the new theme for our FAQ system.
Download the latest version of the Starker’s blank theme, and move the folder into ‘wp-content/themes’, located within the WordPress installation folder. Also, be sure to rename it to FAQ. Next, login to the backend administration panel of WordPress, click on ‘appearance/themes.’ You will find that the default ‘TwentyTen’ theme is activated, while the new theme, ‘Starkers,’ is listed below it. Activate the Starkers theme.

Step 2: Implementing the FAQ Custom Post
To implement the FAQ system, we are going to create a custom post type solely for this purpose. This will enable us to manage all the FAQs in one place, especially if the FAQ question base increases with time.To implement a custom post, edit the
functions.php
file located in the FAQ theme folder. It will contain a good bit of
code, so don’t be scared or confused. Scroll down to the bottom and
append the following to add a new custom post. We begin by creating
hooking a custom function to the initialization (init) action.- // ADDING CUSTOM POST TYPE FAQ
- add_action('init', 'my_custom_init');
- $labels = array(
- 'name' => _x('FAQs', 'post type general name'),
- 'singular_name' => _x('FAQ', 'post type singular name'),
- 'add_new' => _x('Add New', 'FAQ'),
- 'add_new_item' => __('Add New FAQ'),
- 'edit_item' => __('Edit FAQ'),
- 'new_item' => __('New FAQ'),
- 'view_item' => __('View FAQ'),
- 'search_items' => __('Search FAQs'),
- 'not_found' => __('No FAQs found'),
- 'not_found_in_trash' => __('No FAQs found in Trash'),
- 'parent_item_colon' => ''
- );
array for the register_post_type
method. These arguments contain all the important information which
will define the components of our FAQ post. For example, will it have a
tag box; an excerpt box? We pass the array of labels defined above as an
argument, as well.- $args = array(
- 'labels' => $labels,
- 'public' => true,
- 'publicly_queryable' => true,
- 'show_ui' => true,
- 'query_var' => true,
- 'rewrite' => true,
- 'capability_type' => 'post',
- 'hierarchical' => false,
- 'menu_position' => 5,
- 'supports' => array('title','editor','thumbnail','custom-fields')
- );
register_post_type method. You can learn more about this method by referring to its documentation in the WordPress Codex.- function my_custom_init()
- {
- $labels = array(
- 'name' => _x('FAQs', 'post type general name'),
- 'singular_name' => _x('FAQ', 'post type singular name'),
- 'add_new' => _x('Add New', 'FAQ'),
- 'add_new_item' => __('Add New FAQ'),
- 'edit_item' => __('Edit FAQ'),
- 'new_item' => __('New FAQ'),
- 'view_item' => __('View FAQ'),
- 'search_items' => __('Search FAQs'),
- 'not_found' => __('No FAQs found'),
- 'not_found_in_trash' => __('No FAQs found in Trash'),
- 'parent_item_colon' => ''
- );
- $args = array(
- 'labels' => $labels,
- 'public' => true,
- 'publicly_queryable' => true,
- 'show_ui' => true,
- 'query_var' => true,
- 'rewrite' => true,
- 'capability_type' => 'post',
- 'hierarchical' => false,
- 'menu_position' => 5,
- 'supports' => array('title','editor','thumbnail','custom-fields')
- );
- register_post_type('faq',$args);
- }
Dummy FAQ Posts
Now go ahead and add some demo FAQs, because we need some data for creating and testing the template. The title of each FAQ post should be the question, and the content will be the answer.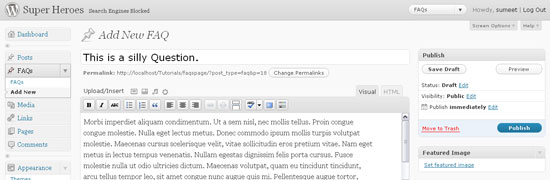
Step 3: Coding the Template
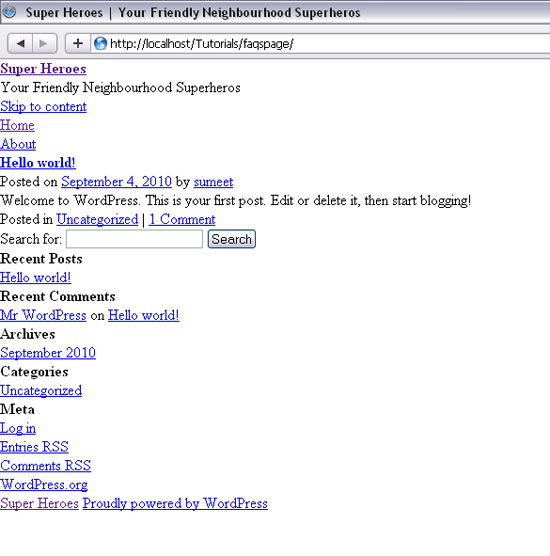
So far, we’ve created FAQ custom posts, as well as inserted a set of sample data. Now, we’ll code the template to display the FAQs, accordingly. The main logic I have used for organizing the template is: use the FAQ’s unique ID to link the question to the answers. Hence, we have two parts in the template: the questions section, listing all the FAQ titles; and the answer section, which displays the content of each of the FAQs.Find the
header.php file, open it, delete the div with an id of “access” at the bottom, and also the paragraph which contains the description of the blog. Now add the following code.- <body >
- <div id="page-wrap">
- <h1>
- <a href="" title="" rel="home">
- </h1>
- <?php
- /**
- * The main template file.
- *
- * This is the most generic template file in a WordPress theme
- * and one of the two required files for a theme (the other being style.css).
- * It is used to display a page when nothing more specific matches a query.
- * E.g., it puts together the home page when no home.php file exists.
- * Learn more: http://codex.wordpress.org/Template_Hierarchy
- *
- * @package WordPress
- * @subpackage Starkers
- * @since Starkers 3.0
- */
- get_header(); ?>
- <?php
- query_posts('post_type=faq&order=ASC')
- ?>
div with an id of “content.”- <div id="content">
- <?php if (have_posts()) : ?>
- <h3>FAQs</h3>
- <div id="questions">
- <ul>
- <?php while (have_posts()) : the_post(); ?>
- <li><a href="#answer<?php the_id() ?>"><?php the_title(); ?></a></li>
- <?php endwhile; ?>
- </ul>
- </div>
- <?php else : ?>
- <h3>Not Found</h3>
- <p>Sorry, No FAQs created yet.</p>
- <?php endif; ?>
id to it. We can use this to jump to the answers, when clicked.After we’ve displayed all of the questions, we “rewind” our posts to return to the beginning.
- <?php rewind_posts(); ?>
- <?php if (have_posts()) : ?>
- <div id="answers">
- <ul>
- <?php while (have_posts()) : the_post(); ?>
- <li id="answer<?php the_id(); ?>">
- <h4><?php the_title(); ?></h4>
- <?php the_content(); ?>
- </li>
- <?php endwhile; ?>
- </ul>
- </div>
- <?php endif; ?>
- <?php wp_reset_query(); ?>
- </div>
- <?php get_footer(); ?>
id of “answers” with the post ID
appended to it. This is important: when the question is clicked, the
view jumps to the content of the respective post. If you’re working
along, preview your site; you should see all the posts listed in the
architecture described above.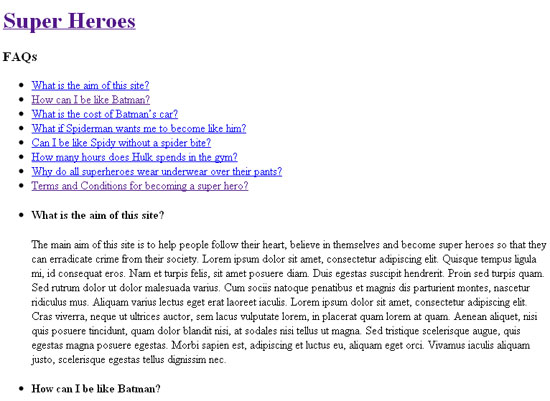
Step 4: Styling the Template
Styling of the FAQ page depends entirely on your tastes; you can proceed in any manner you wish. If you’re a designer, feel free to skip Step 4. What I have personally implemented is a smooth and clean layout. When the user clicks on the question, the page smoothly scrolls down to the respective answer and highlights it by changing the colour and increasing the font size. To achieve this, we’ll start by styling the template with CSS. We can make use of CSS3 to add some shadows and transition effects, too. Add the following CSS tostyles.css.- body{
- background-color: #bcbcbc;
- }
- .clear {
- clear: both;
- }
- h1,h2,h3,h4,h5,h6{
- color:#424242;
- font-family:Georgia,Arial,Helvetica,sans-serif;
- text-shadow: #fff 1px 1px 0px;
- }
- h1 a{
- color:#424242;
- font-size:50px;
- position:relative;
- top:11px;
- font-weight: normal;
- z-index: 100;
- }
- h3{
- font-size: 20px;
- font-weight: bold;
- margin-bottom: 20px;
- }
- h4{
- font-size: 14px;
- font-weight: bold;
- margin-bottom: 10px;
- }
- a{
- color: #3299bb;
- text-decoration: none;
- -moz-transition: all 0.2s ease-in-out;
- -webkit-transition: all 0.2s ease-in-out;
- -o-transition: all 0.2s ease-in-out;
- transition: all 0.2s ease-in-out;
- }
- #page-wrap{
- width: 750px;
- position: relative;
- margin: 0px auto 20px auto;
- padding-top: 50px;
- }
- #content{
- background-color: #e9e9e9;
- padding: 64px 35px 22px;
- font-size: 14px;
- font-family: Arial, Helvetica, sans-serif;
- -webkit-box-shadow: rgba(0,0,0,1) 0px 0px 4px;
- -moz-box-shadow: rgba(0,0,0,1) 0px 0px 4px;
- box-shadow: rgba(0,0,0,1) 0px 0px 4px ;
- }
- #content p{
- text-align:justify;
- font-size: 12px;
- line-height: 18px;
- margin-bottom: 10px;
- }
- #questions{
- margin-bottom: 50px;
- }
- #questions li{
- margin-bottom: 20px;
- color: #3299bb;
- list-style-type: disc;
- list-style-position: inside;
- }
- #questions ul li a{
- font-weight: bold;
- }
- #questions ul li a:hover{
- color: #00befd;
- }
- #questions ul li a:active{
- color: #e78c03;
- }
- #answers ul li{
- margin-bottom: 30px;
- clear: both;
- }
- #footer{
- padding-top:5px;
- text-align:center;
- }
- #footer p{
- color: #424242;
- }
- #footer a{
- color: #424242;
- font-weight: bold;
- }
- .current-faq{
- background-color: #424242;
- color: #e9e9e9;
- padding:30px 30px 23px;
- }
- .current-faq h4{
- color: #e9e9e9;
- font-weight: bold;
- font-size:22px;
- text-shadow: #000 1px 1px 0px;
- }
- .top-button {
- border-top: 1px solid #96d1f8;
- background: #2289a8;
- background: -webkit-gradient(linear, left top, left bottombottom, from(#3299bb), to(#2289a8));
- background: -moz-linear-gradient(top, #3299bb, #2289a8);
- padding: 4px 8px;
- -webkit-border-top-left-radius: 6px;
- -moz-border-radius-topleft: 6px;
- border-top-left-radius: 6px;
- -webkit-box-shadow: rgba(0,0,0,1) -1px -1px 0;
- -moz-box-shadow: rgba(0,0,0,1) -1px -1px 0;
- box-shadow: rgba(0,0,0,1) -1px -1px 0;
- text-shadow: rgba(0,0,0,.4) -1px -1px 0;
- color: #ffffff;
- font-size: 11px;
- font-family: Georgia, serif;
- text-decoration: none;
- vertical-align: middle;
- font-weight: bold;
- float: rightright;
- rightright:-30px;
- position: relative;
- }
- .top-button:hover {
- border-top-color: #0b93bd;
- background: #0b93bd;
- color: #ffffff;
- }
- .top-button:active {
- border-top-color: #e78c03;
- background: #e78c03;
- }
class is working properly by assigning the class to any of the list elements. The current FAQ should look like the following: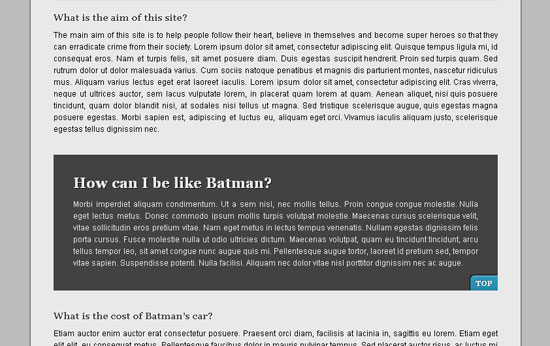
Step 5: Adding a Pinch of jQuery UI
We’ll use jQuery UI to add some effects to the page. You can download jQuery UI here. We only need limited use of the whole UI library, hence, downloading only the UI core components will suffice. We also need the jQuery scrollTo plug-in for achieving the smooth scrolling effect — though you could also easily code this functionality on your own. Nonetheless, to save time, you can download the plug-in here.First, we reference jQuery, the jQuery UI Core files, and the scrollTo plug-in within the
header.php file. You can do this by adding the following code just before the wp_head() method.- <?php wp_enqueue_script("jquery"); ?><!--VERY IMPORTANT-->
- <script src="http://ajax.googleapis.com/ajax/libs/jquery/1.4.2/jquery.js" type="text/javascript"></script>
- <script src="<?php bloginfo('template_url') ?>/js/jquery-ui-1.8.4.custom.min.js" type="text/javascript"></script>
- <script src="<?php bloginfo('template_url') ?>/js/jquery.scrollTo.js" type="text/javascript"></script>
- <script src="<?php bloginfo('template_url') ?>/js/main.js" type="text/javascript"></script>
The wp_enqueue_script statement is needed in order to load jQuery safely.
To enable our desired functionality, we fetch the value of the href attribute from the clicked element (i.e. the question). This value is the id of the list element which contains the answer. Then, we scroll to the list element, and apply the ‘current’ class. jQuery UI will ensure that the class is implemented on the list element smoothly and dynamically.- $(document).ready(function(){
- $("div#questions ul a").click(function(){
- var selected = $(this).attr('href');
- selected += '"'+selected+'"';
- /*--Removing the Current class and the top button from previous current FAQs---*/
- $('.top-button').remove();
- $('.current-faq').removeClass();
- $.scrollTo(selected, 400 ,function(){
- $(selected).addClass('current-faq', 400, function(){
- $(this).append('<a href="#" class="top-button">TOP</a>');
- });
- });
- return false;
- });
- $('.top-button').live('click',function(){
- $(this).remove();
- $('.current-faq').removeClass('current-faq',400,function(){
- $.scrollTo('0px', 800);
- });
- return false;
- })
- });